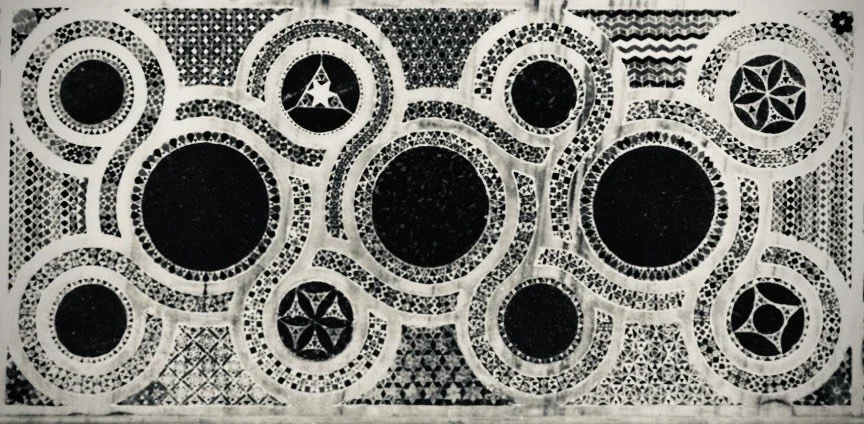
Quincunx
The Cosmati craftsmen did not leave us their work manual. Instead they left us mesmerising geometric puzzles to unravel. Puzzles just as ordered, as they are varied. With lack of concrete historical evidence of how exactly they went about constructing the pavements and their ornaments, much is guess work. There is usually more than one possible solution to any given geometric riddle. The character of a solution often reflects the area of study the author comes from originally and I find it exciting to encounter new analyses, even if I do not necessarily agree with their validity.
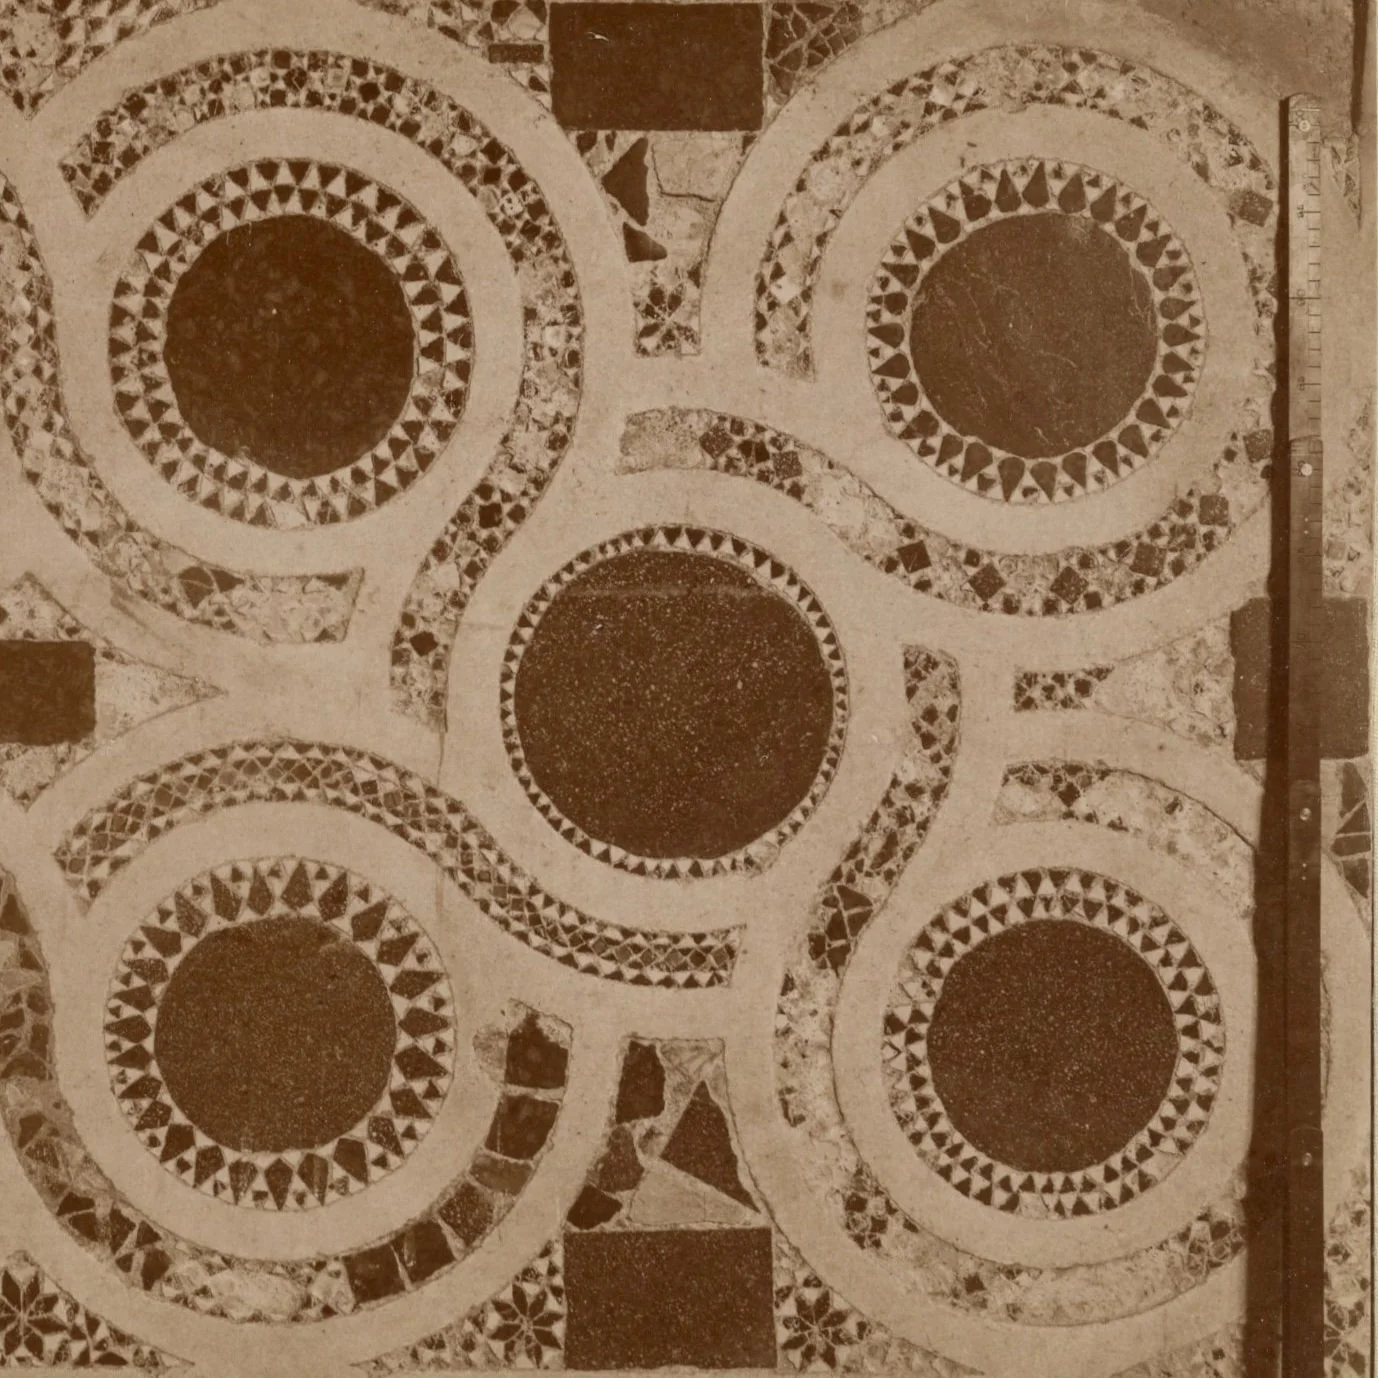
A difficulty when analysing Cosmatesque quincunxes comes from their size and positioning within the churches. It is almost impossible to make a quality photograph of a floor quincunx without specialist equipment and a permission to use it and even then church pews often cover part of the design. Examples on church furnishings, much smaller in size, are simpler to record up front. Floor plans of churches are of help if they include a reliable image of the ornaments and these can sometimes be found in academic papers dedicated to the history of a particular pavement. With more churches investing in quality websites, it would be of much help if photographs and/or plans of their floors could include the Cosmatesque elements presented in good quality.

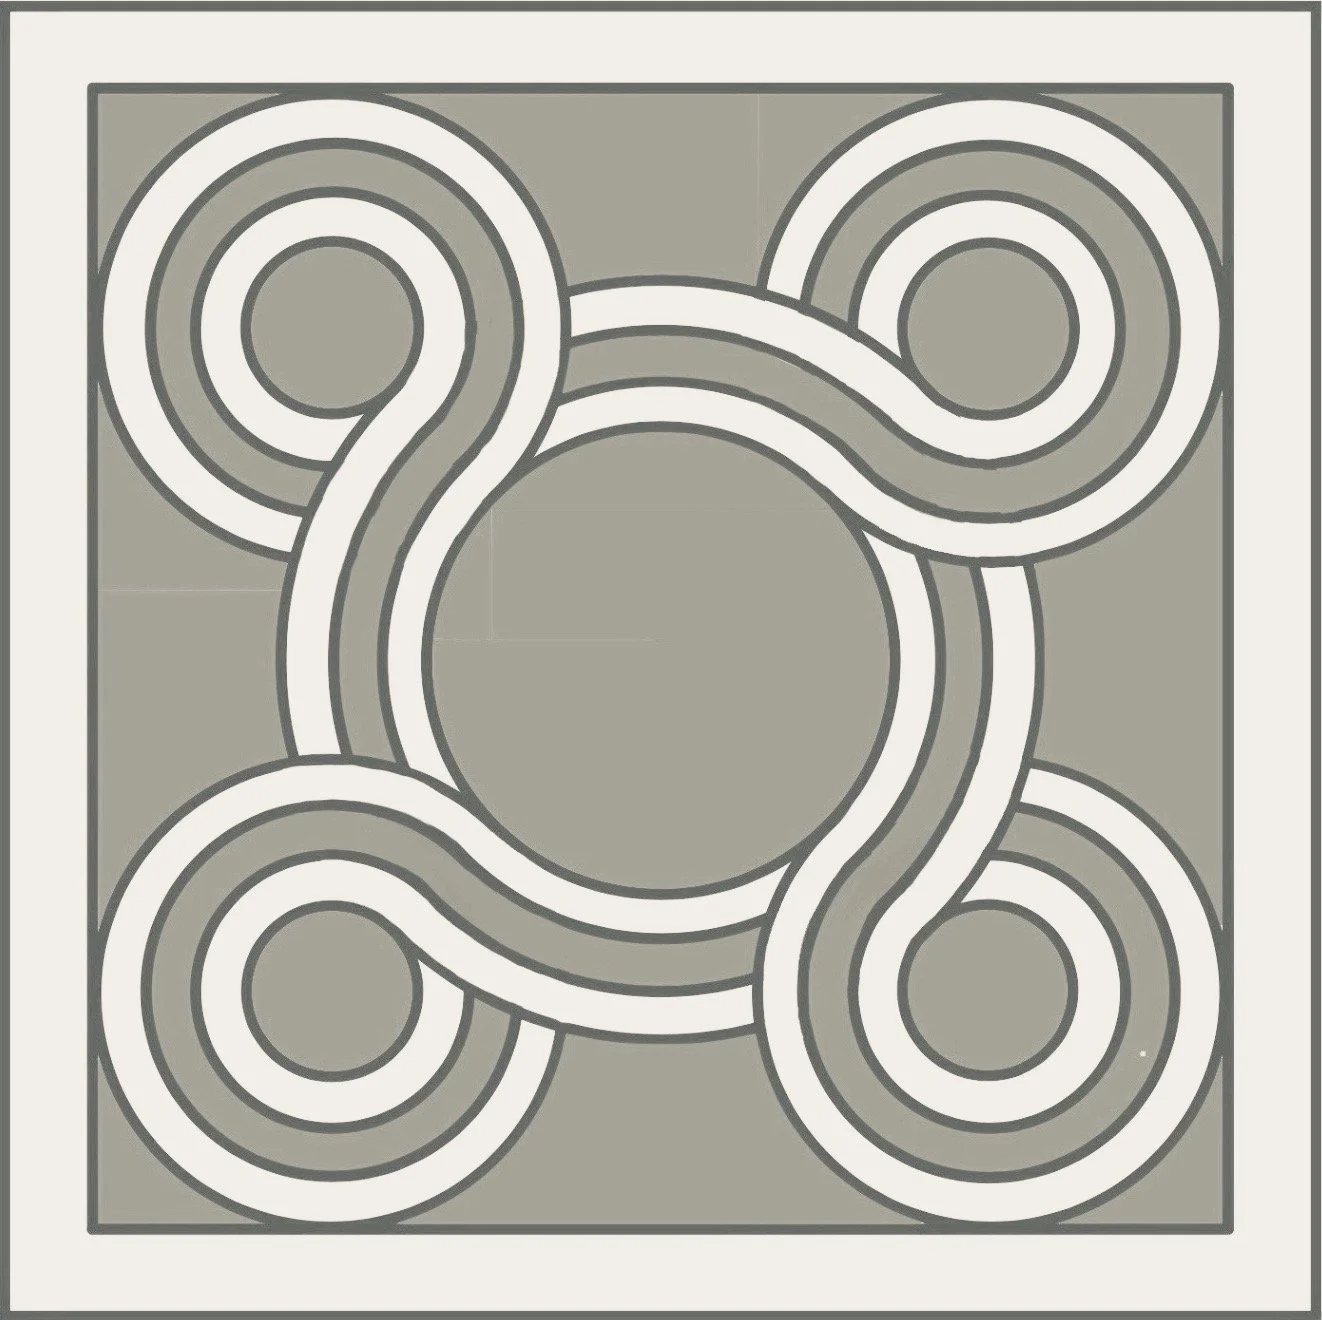
However, although much varied, Cosmatesque quincunxes have, on most occasions, woven rings divided into three bands of equal width: two outer of plain light marble and an inner band with a geometric pattern infill in opus sectile.
Instructions underneath show how to create these bands on the Simple Quincunx construction. Please keep in mind that this is not the sole arrangement, it is one example of how to construct the bands. It is a solution and, as I explained at the beginning, there is more than one answer, each giving different size relationship between the central and the corner rings.
Quincunx Bands
Materials:
compass
30cm ruler
50cm ruler in available
H or 2H pencil
A3 printer or technical paper
A3 card or cutting mat
eraser
Notes:
start with the A3 paper in portrait orientation and turn to horizontal orientation for comfort once the main square has been constructed
using A3 paper and radius approx. 10cm follow all the steps for Quadrature, progress with the Simple Quincunx up to step no.12 on the same drawing, then continue with the instructions below
since this construction is larger in size, when drawing the vertical axis (step no.8 in Quadrature) a 30cm ruler will not be sufficient in length for the entire line. Either use a longer ruler or draw this line in two parts, joining first point G to Z and then Z to H
please use the contact button should you have any queries or would like to share your work
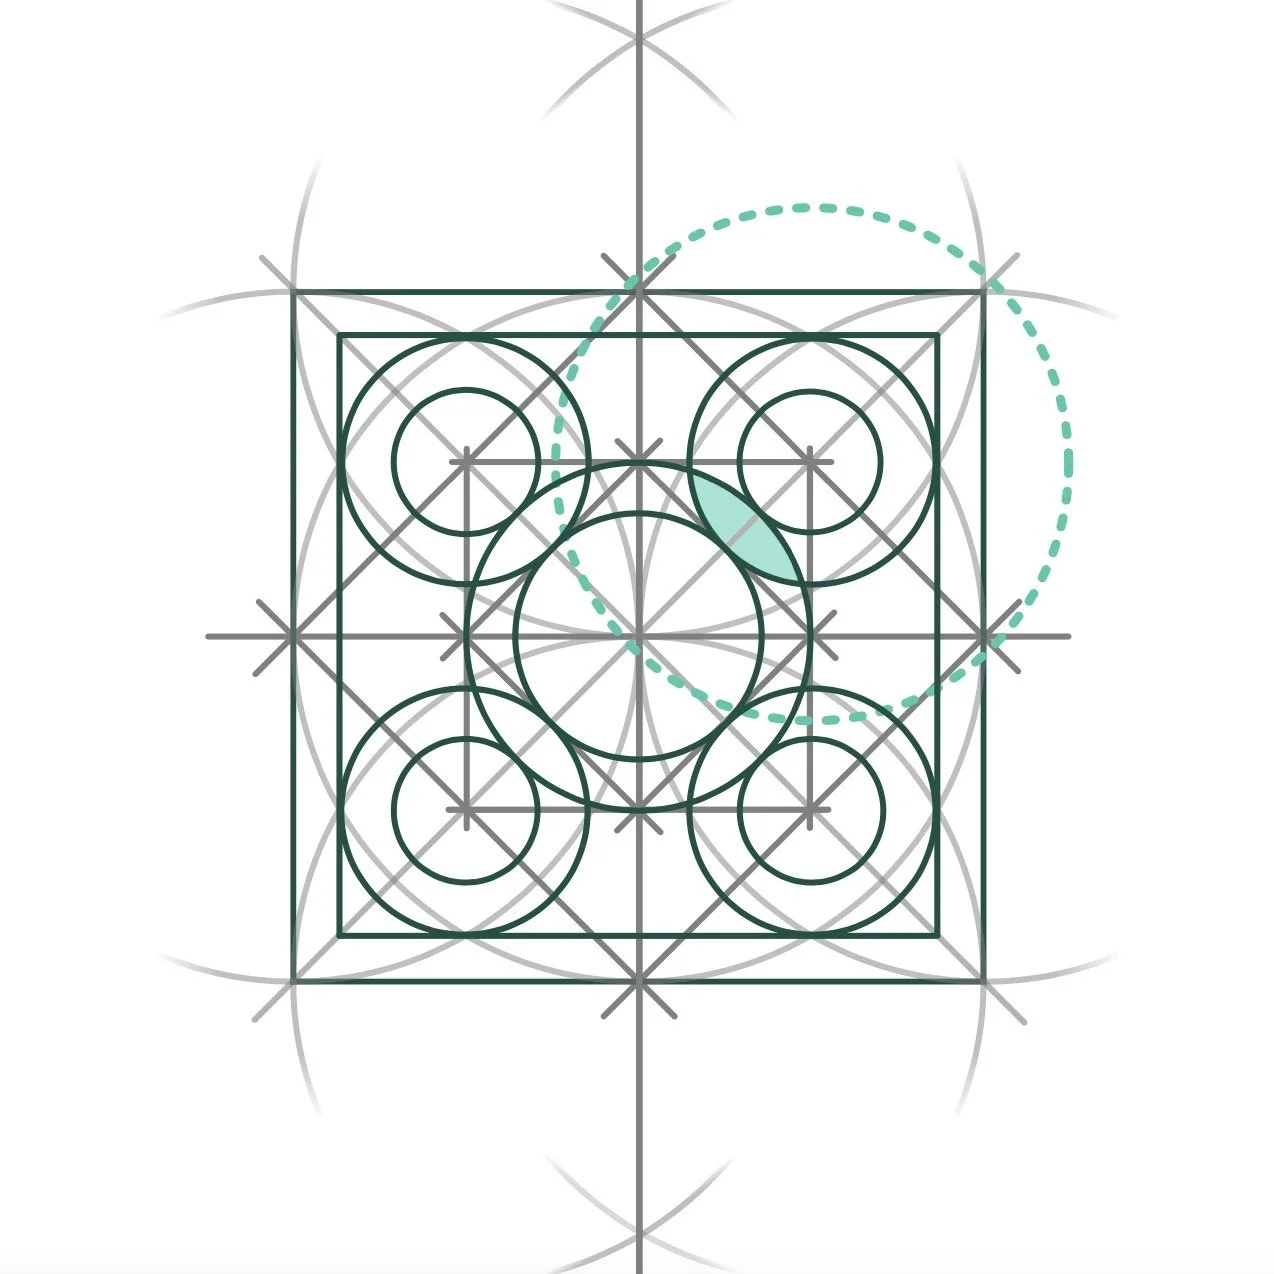
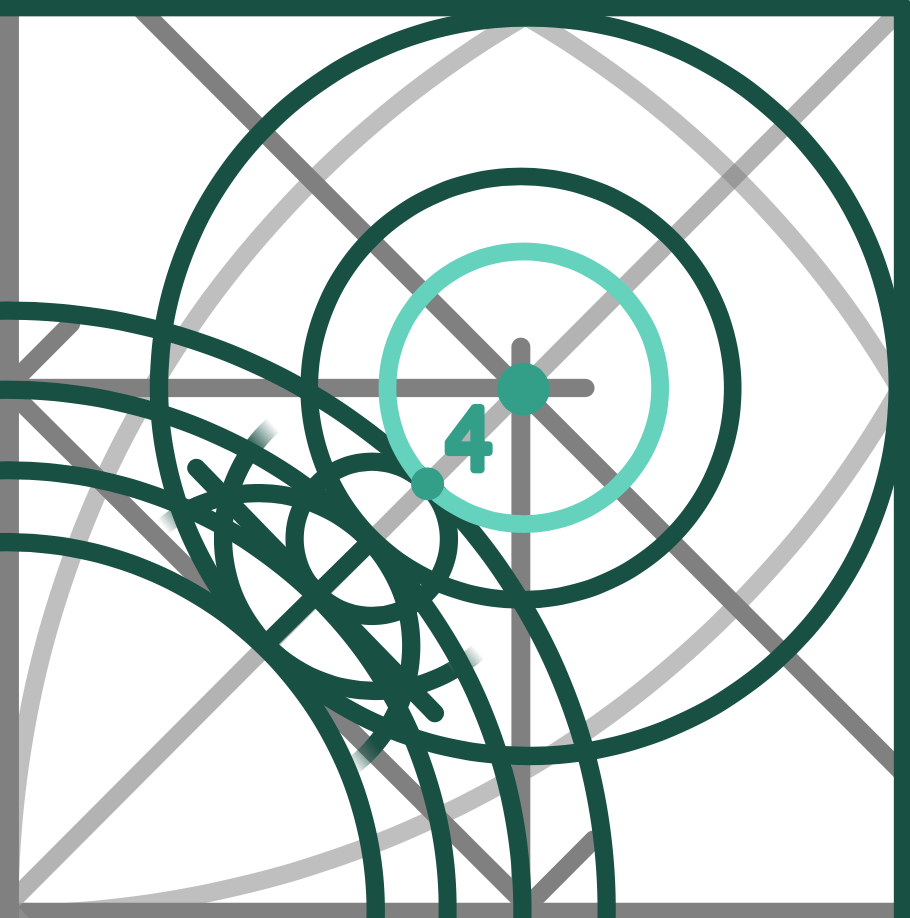
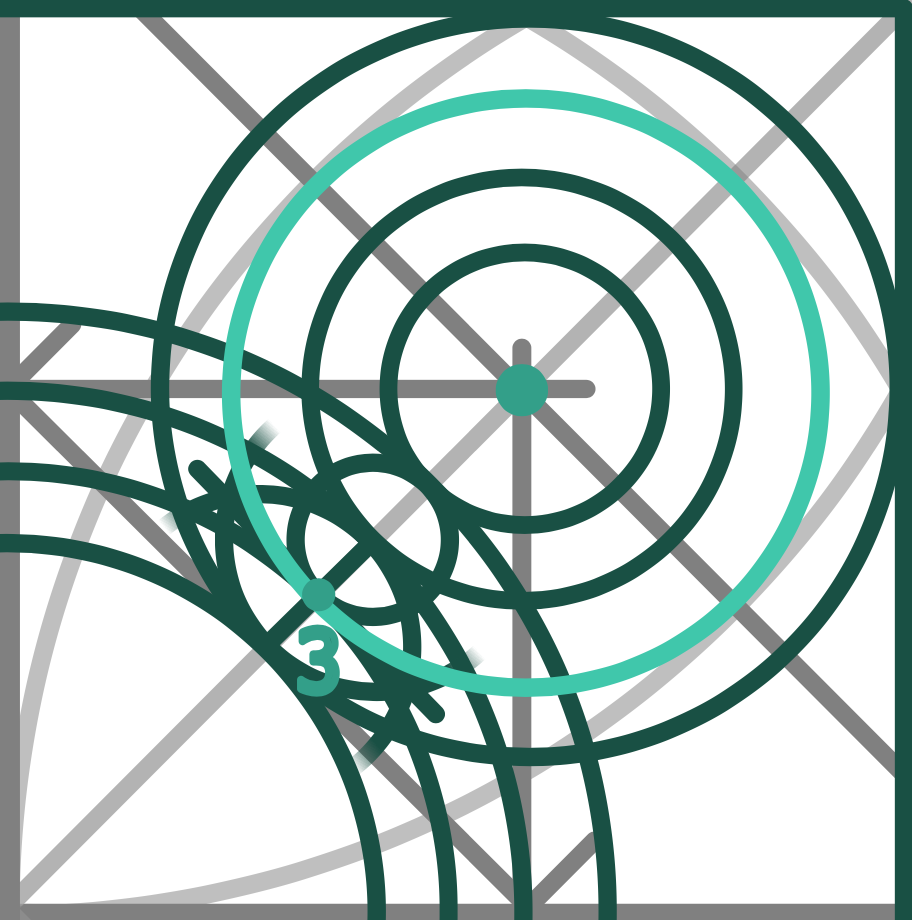
1) Pick any of the corner rings to make a division which will give the width of the bands.

2) This division will be made on the diagonal axis of the construction. Find the segment which is shared by the central ring and the corner ring. Mark points 1 and 2 as above.

3) Draw a Vesica Piscis between points 1 and 2. First place the compass needle in point 1 and with radius 1-2 mark an arch which should pass through point 2. Mirror this action from point 2 to gain one intersection above and one below segment 1-2.

4) Join the Vesica Piscis intersections with a line perpendicular to segment 1-2. It will divide this segment, and therefore the widths of both the central and the corner rings of the quincunx, into two equal parts.

5) Identify the intersection where segment 1-2 is halved and mark it as point 3.

6) Place compass needle in point 2 and with radius 2-3 draw a circle. This circle should go through point 3.

7) Identify the point where this new circle’s circumference intersects with the diagonal axis of the construction (opposite point 3). Mark this new point as 4.

8) Place compass needle back in the centre point Z. Stretch the compass to point 4 and with radius Z4 mark a circle. It will fall on the outside of the central ring of the quincunx. This adds to the central ring 1/2 of its width.
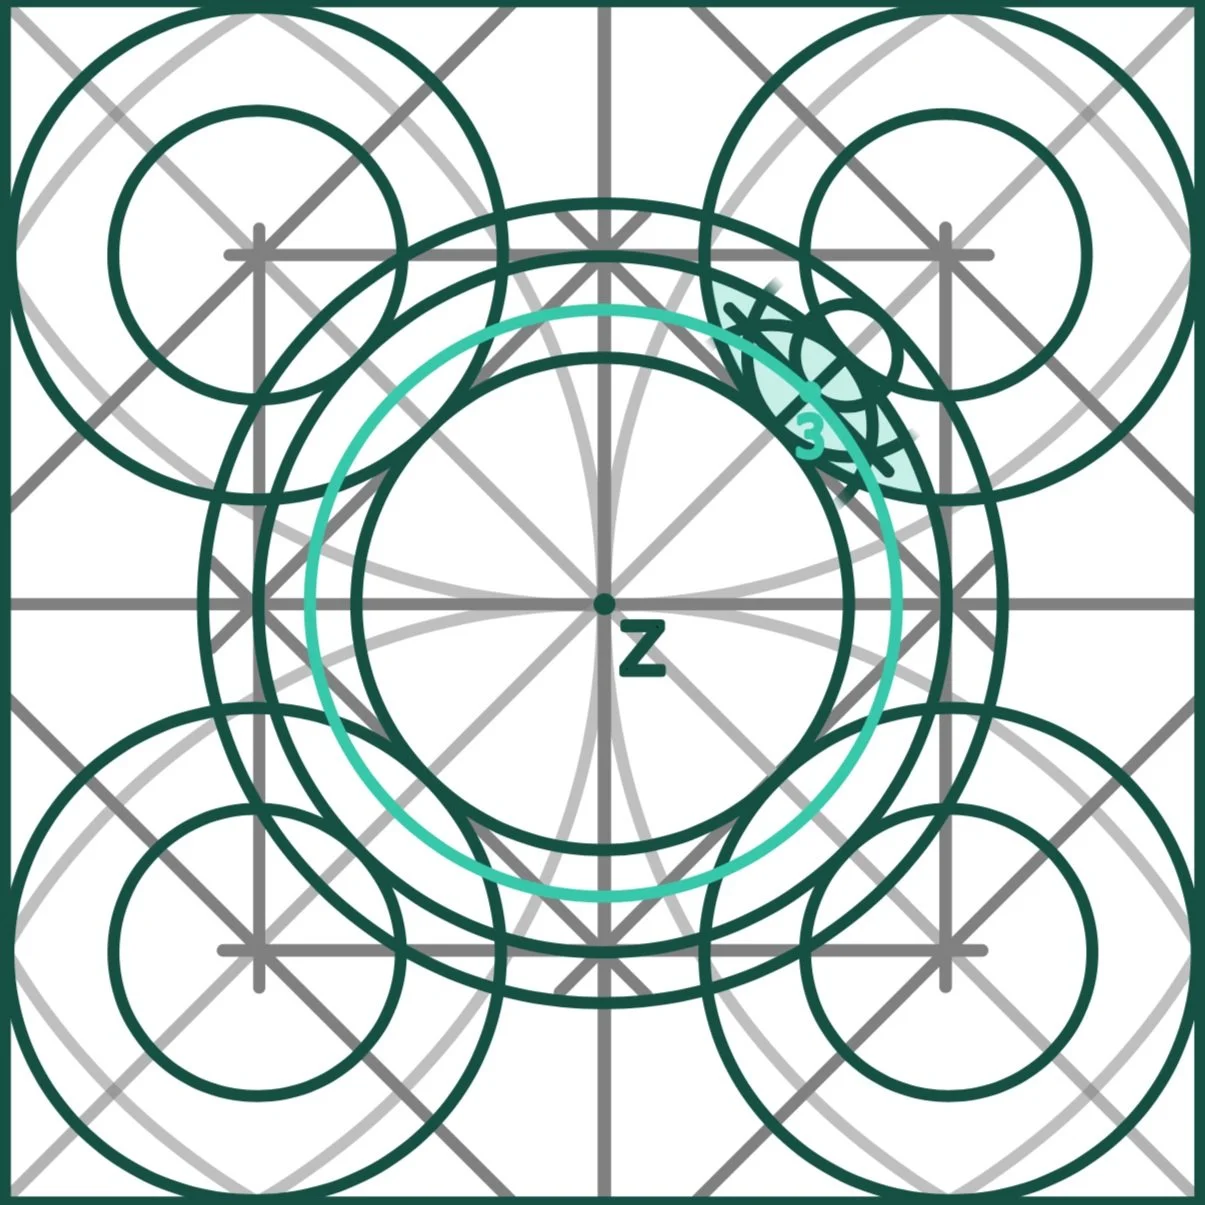
9) With the compass needle still in centre point Z move the other compass leg inwards to point 3. With radius Z3 draw a circle. It will be between the original outer and inner rims of the central ring of the quincunx.

10) There should now be four hoops to the central ring of the quincunx, designating the three bands.
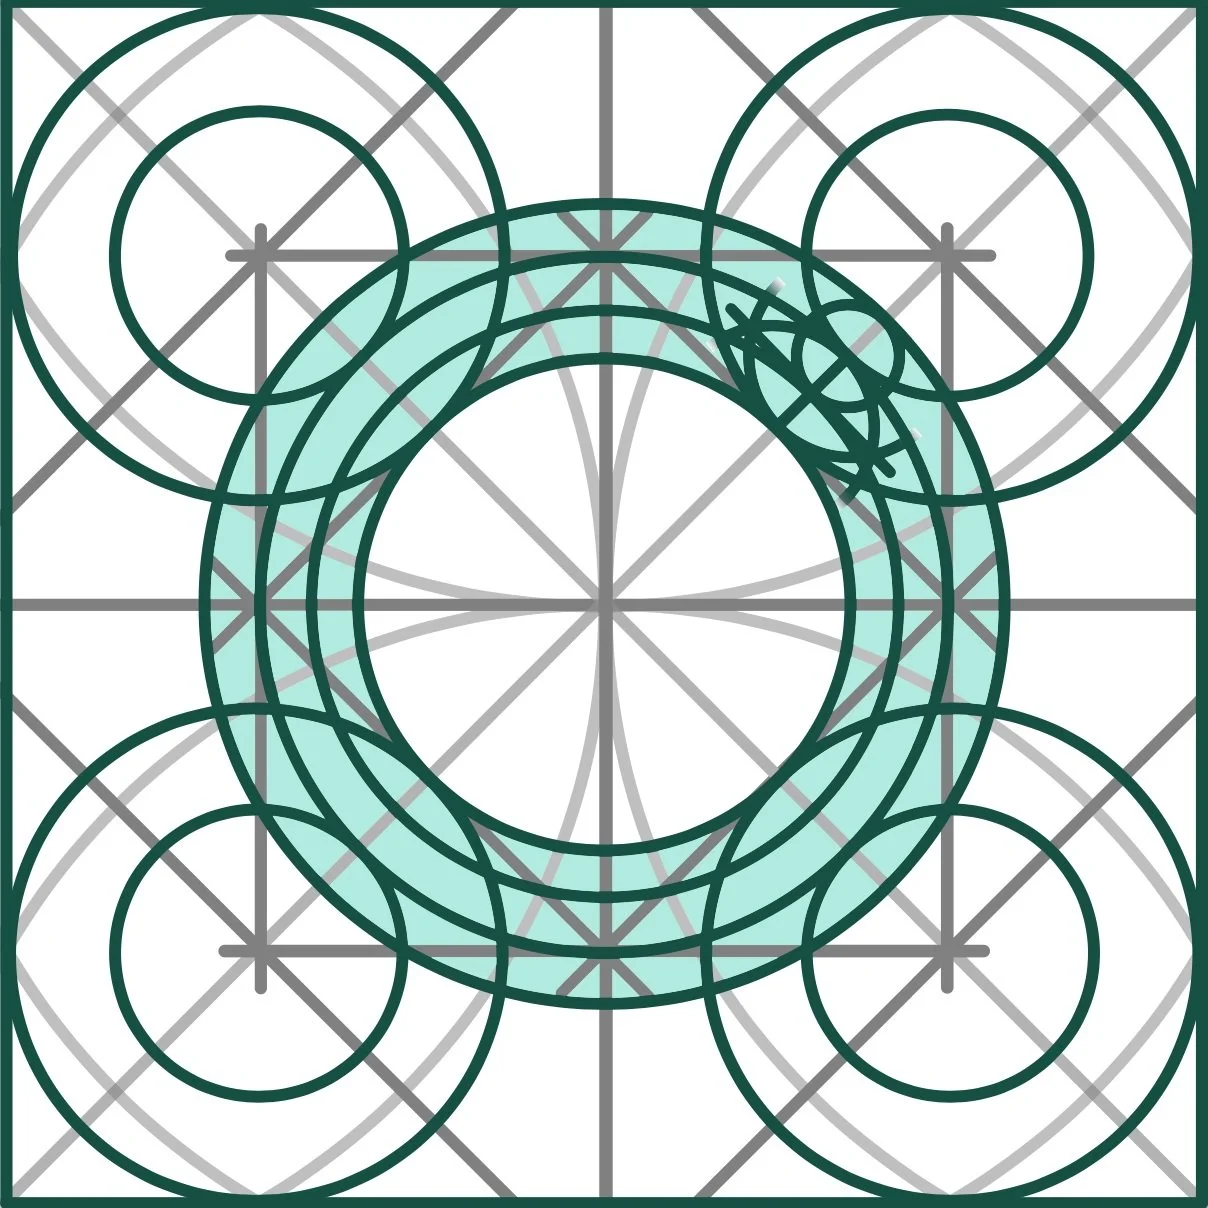
11) The inner ring bands are now complete. The next step it to add two extra hoops to each of the corner rings: one between the original rims and one on the inside.

12) Identify the centre point of the corner ring where the Vesica Piscis division was constructed.
13) Place the compass needle in this centre and stretch the other compass leg to point 4. Draw a circle. This is the innermost hoop of the corner ring. It will be the same for all the corner rings.
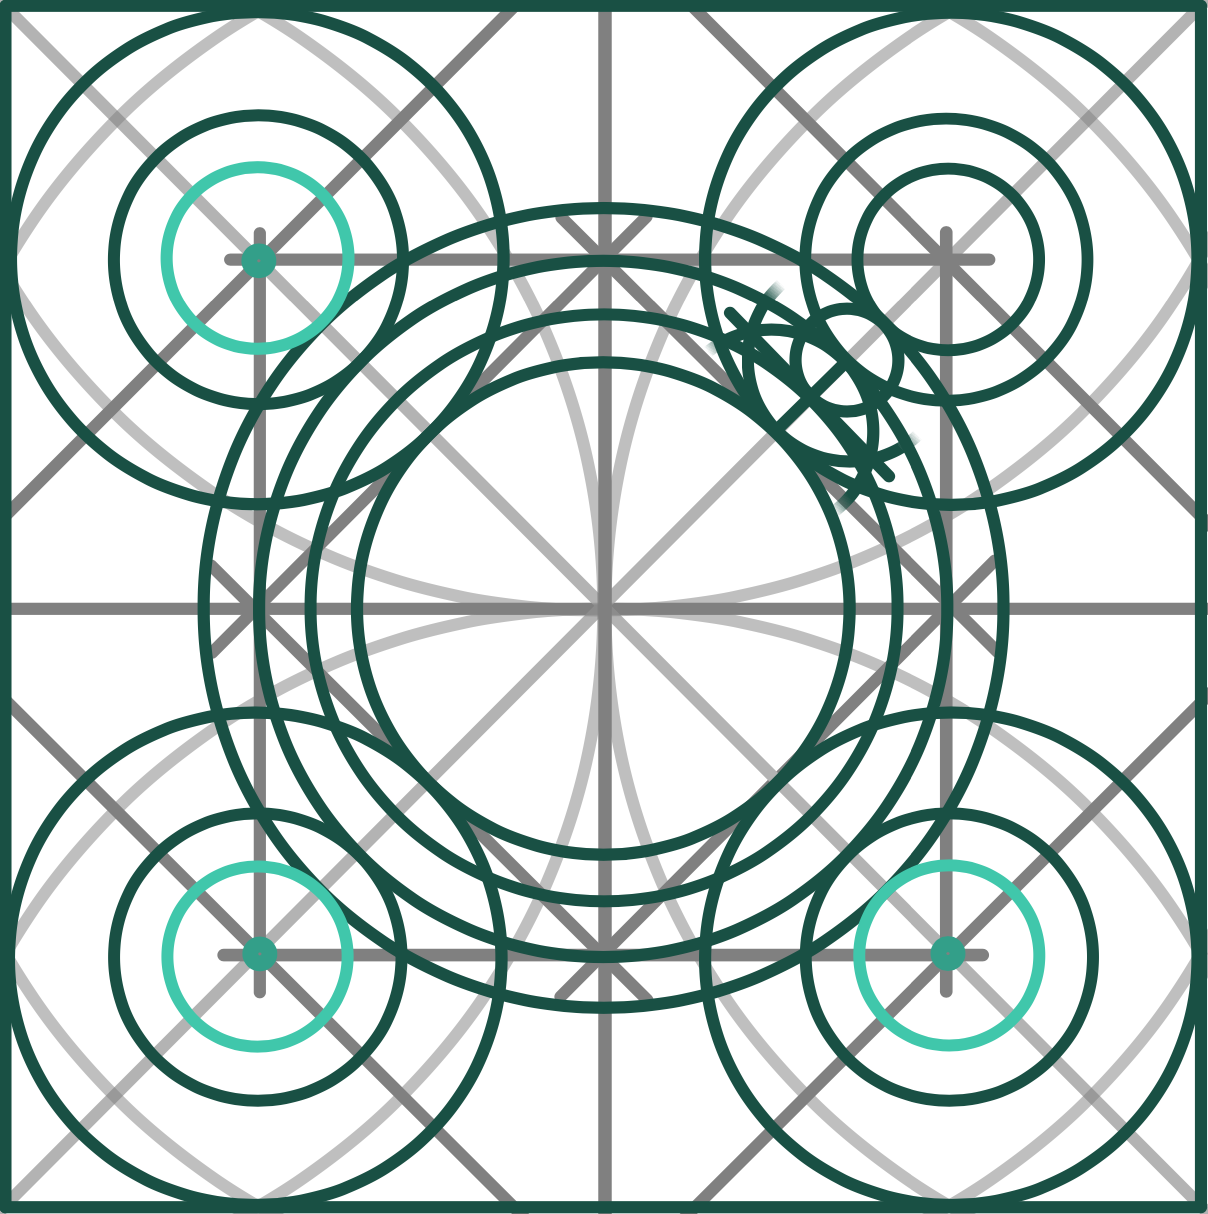
14) Repeat the same action in each of the corner rings, giving each one of them an innermost hoop.
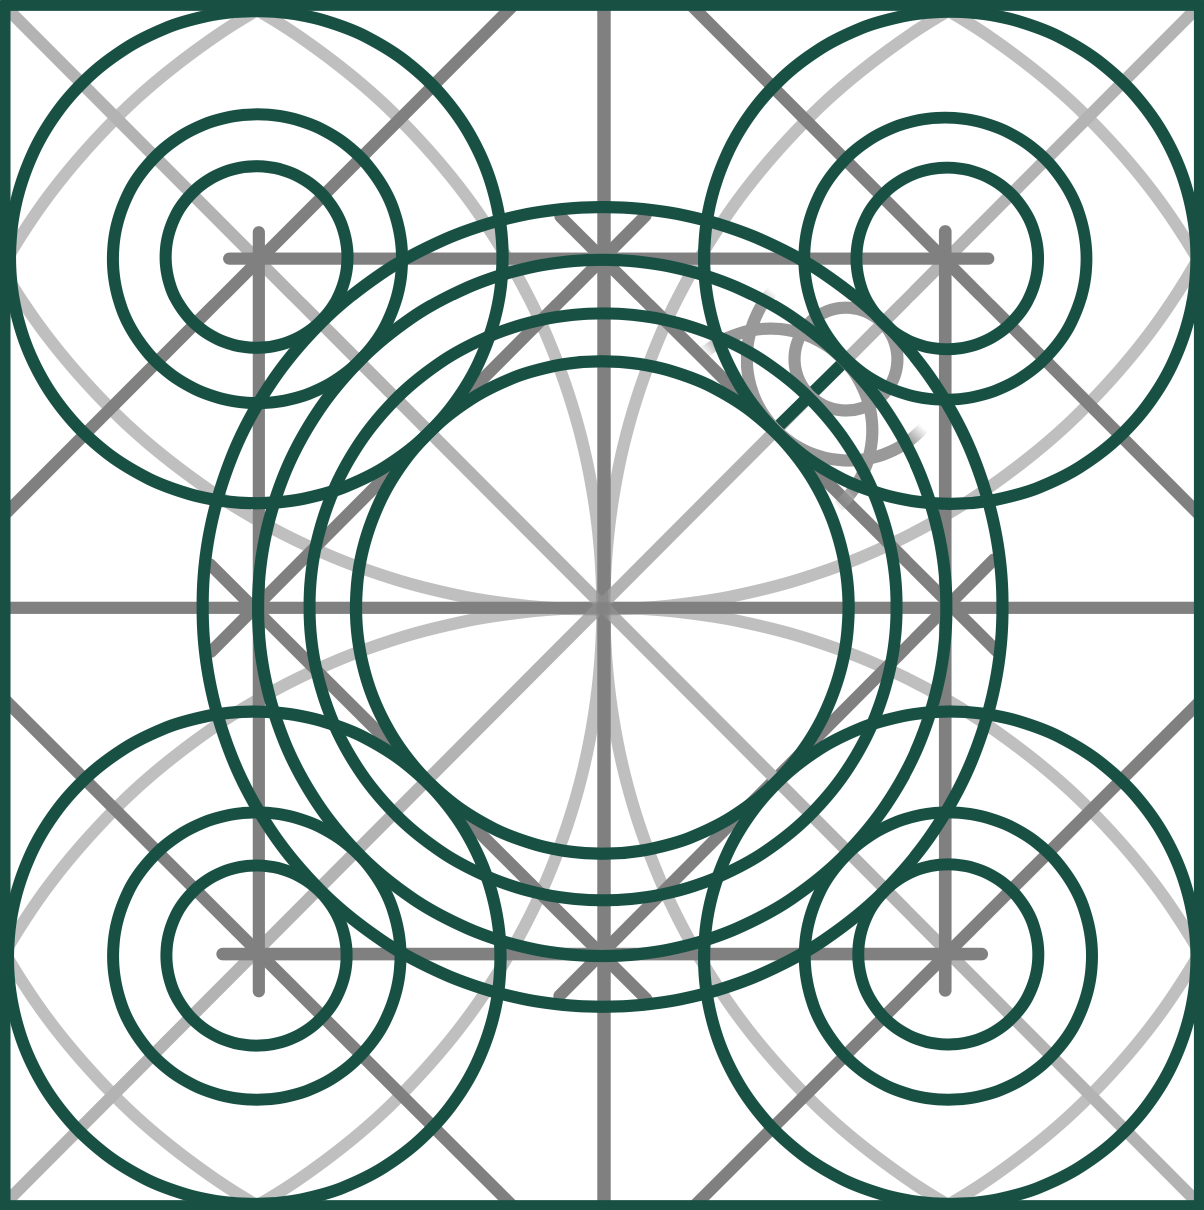
15) Each corner ring should now have three hoops and will need one more to form the three bands equal in width.
16) Return to the centre point of the corner ring where the Vesica Piscis divison was constructed. Place compass needle in this point.
17) Stretch the other compass leg to point 3 and draw a circle. It will give the fourth and final hoop to the corner ring of the quincunx.
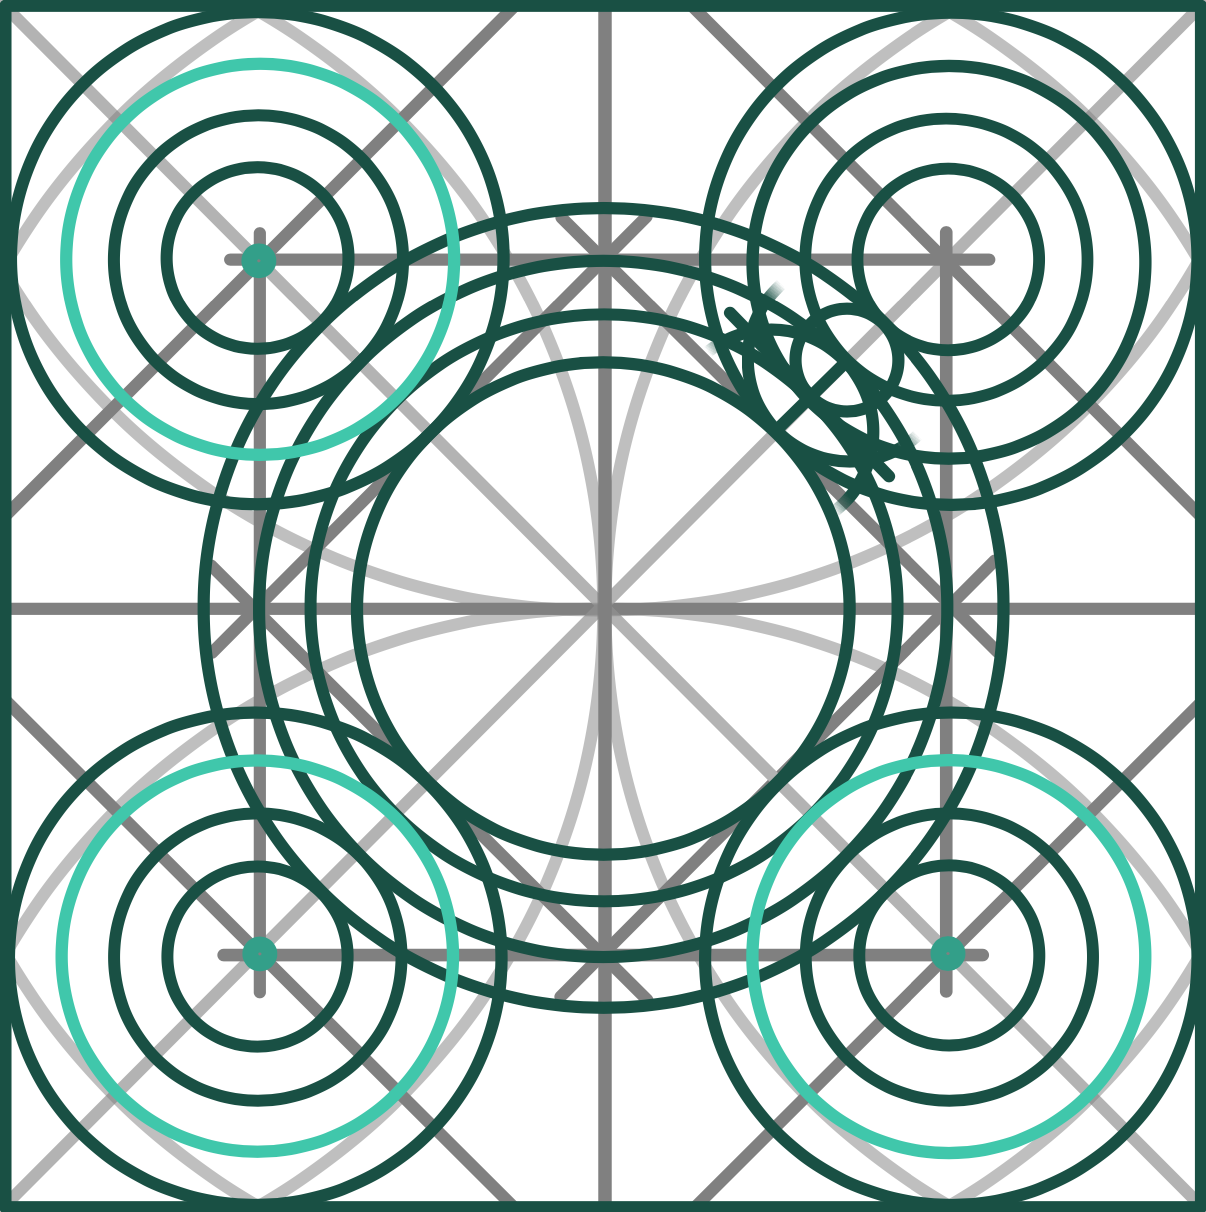
18) Repeat the same action for each of the remaining three corner rings of the quincunx.

19) All circles necessary for the quincunx bands are now drawn and can be woven.
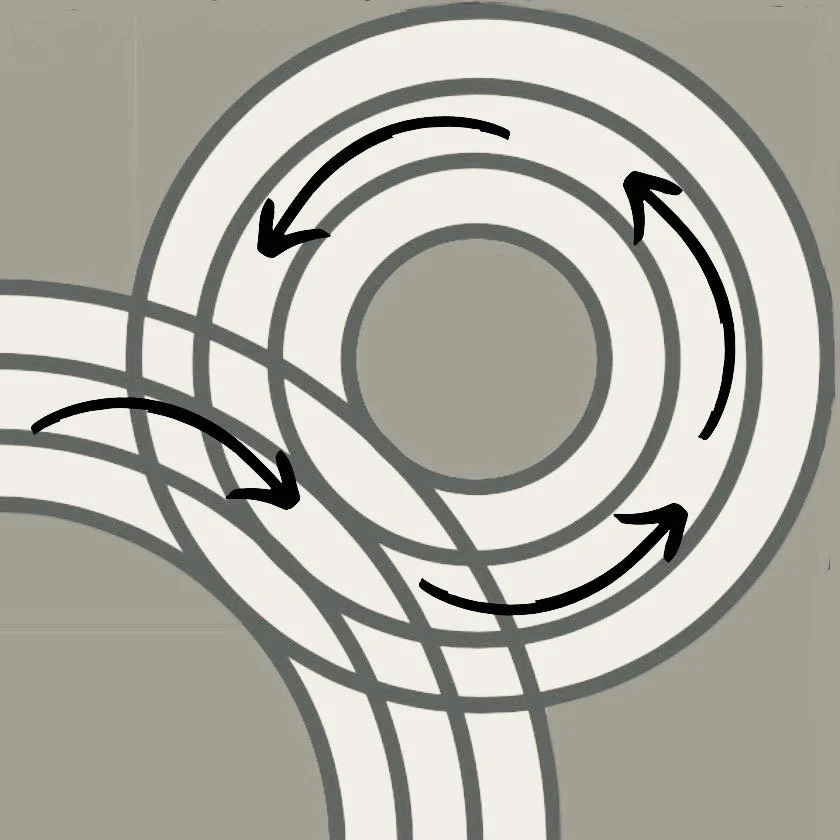
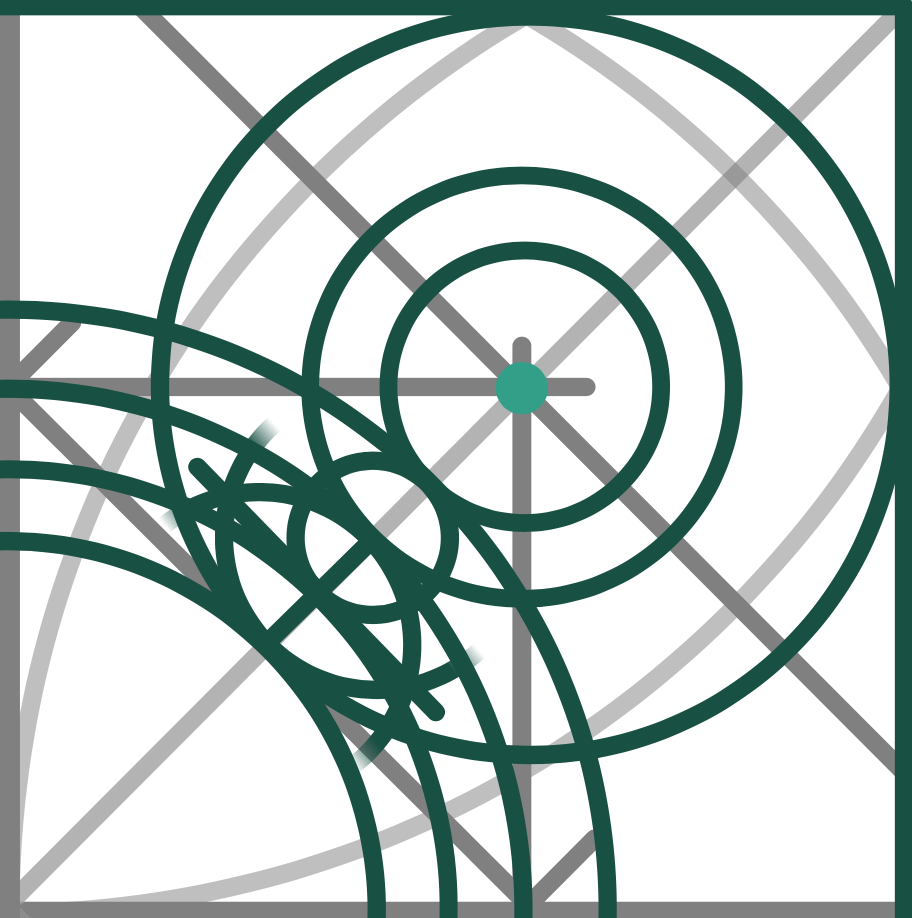
20) The weaving is done as previously, but more attention needs to be given so as not to get the lines confused. Run your finger along the central ring and loop around the corner ring.
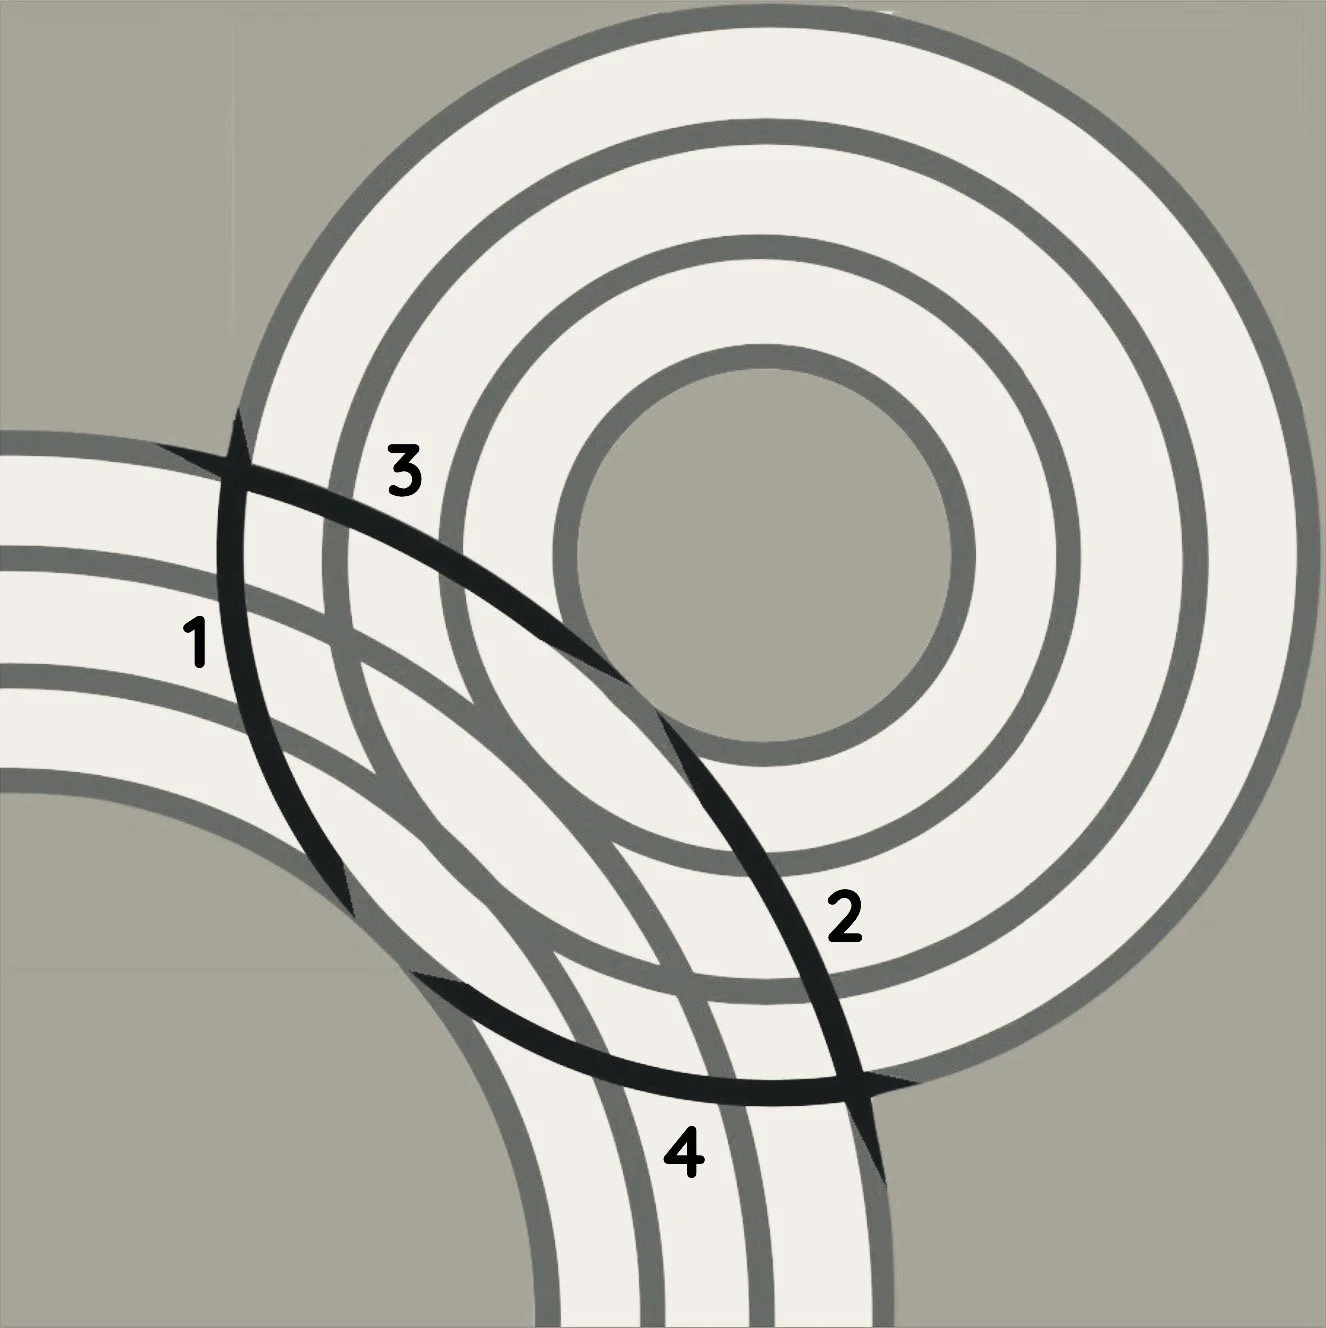
21) Previously as the finger crossed four lines, either the first two were removed (lines marked in black 1 and 2) or the later two (lines marked in black 3 and 4) depending on whether the quincunx was woven clockwise or anti-clockwise.
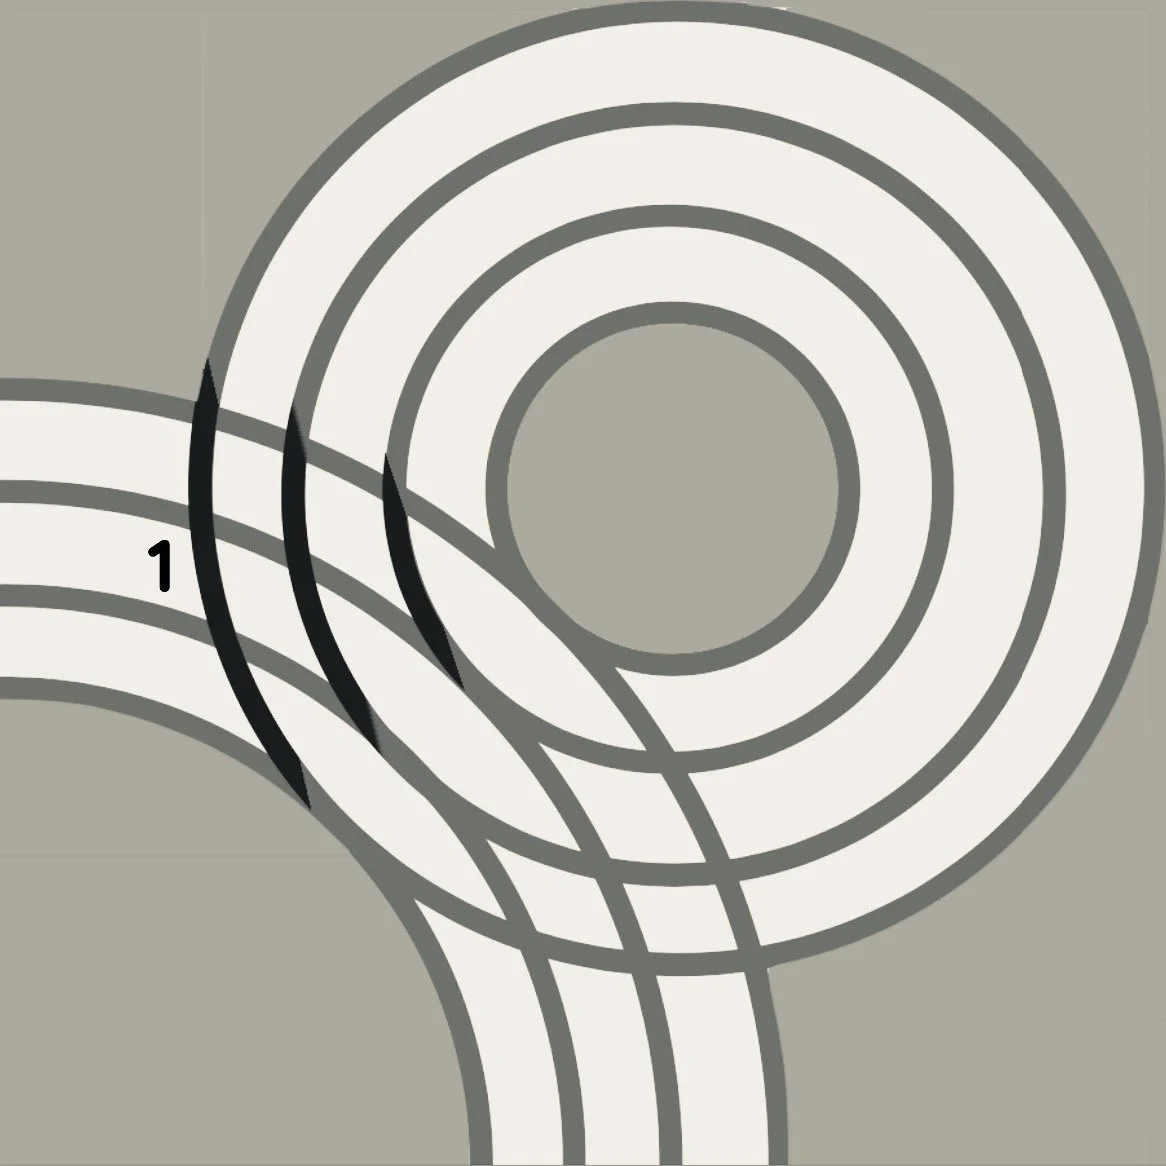
22) With the bands now woven there will be a set of three lines to erase where before there was just one. Line 1 is shown with its two echoes. They diminish in size towards the centre of the corner ring.
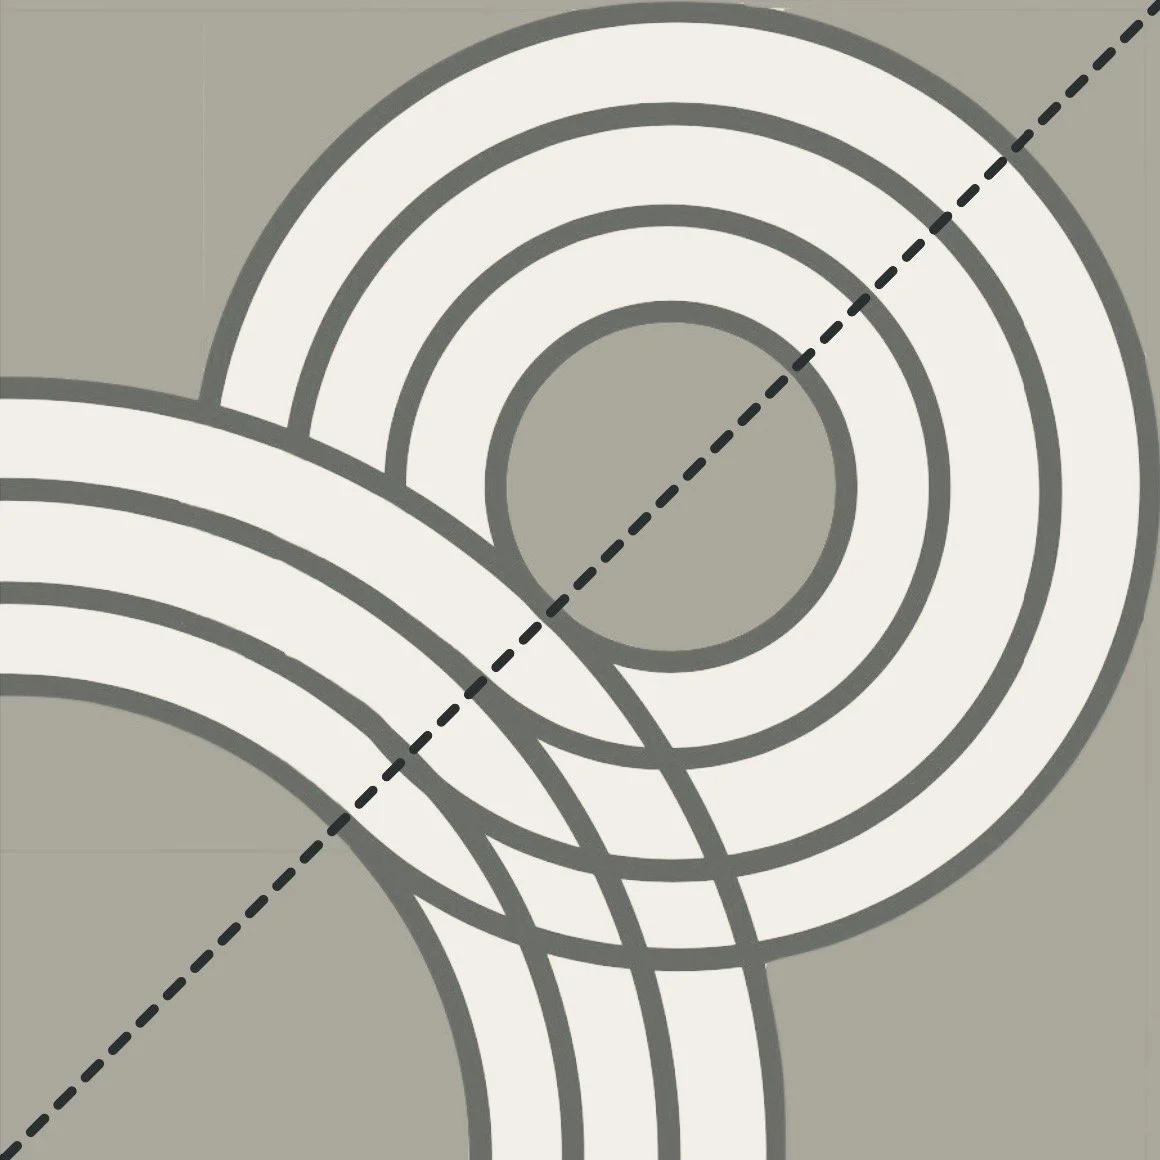
23) The cut-off point for erasing is the diagonal axis of the construction. The first set of three lines has now been removed.
24) The process is repeated for line 2 and its two echoing lines.
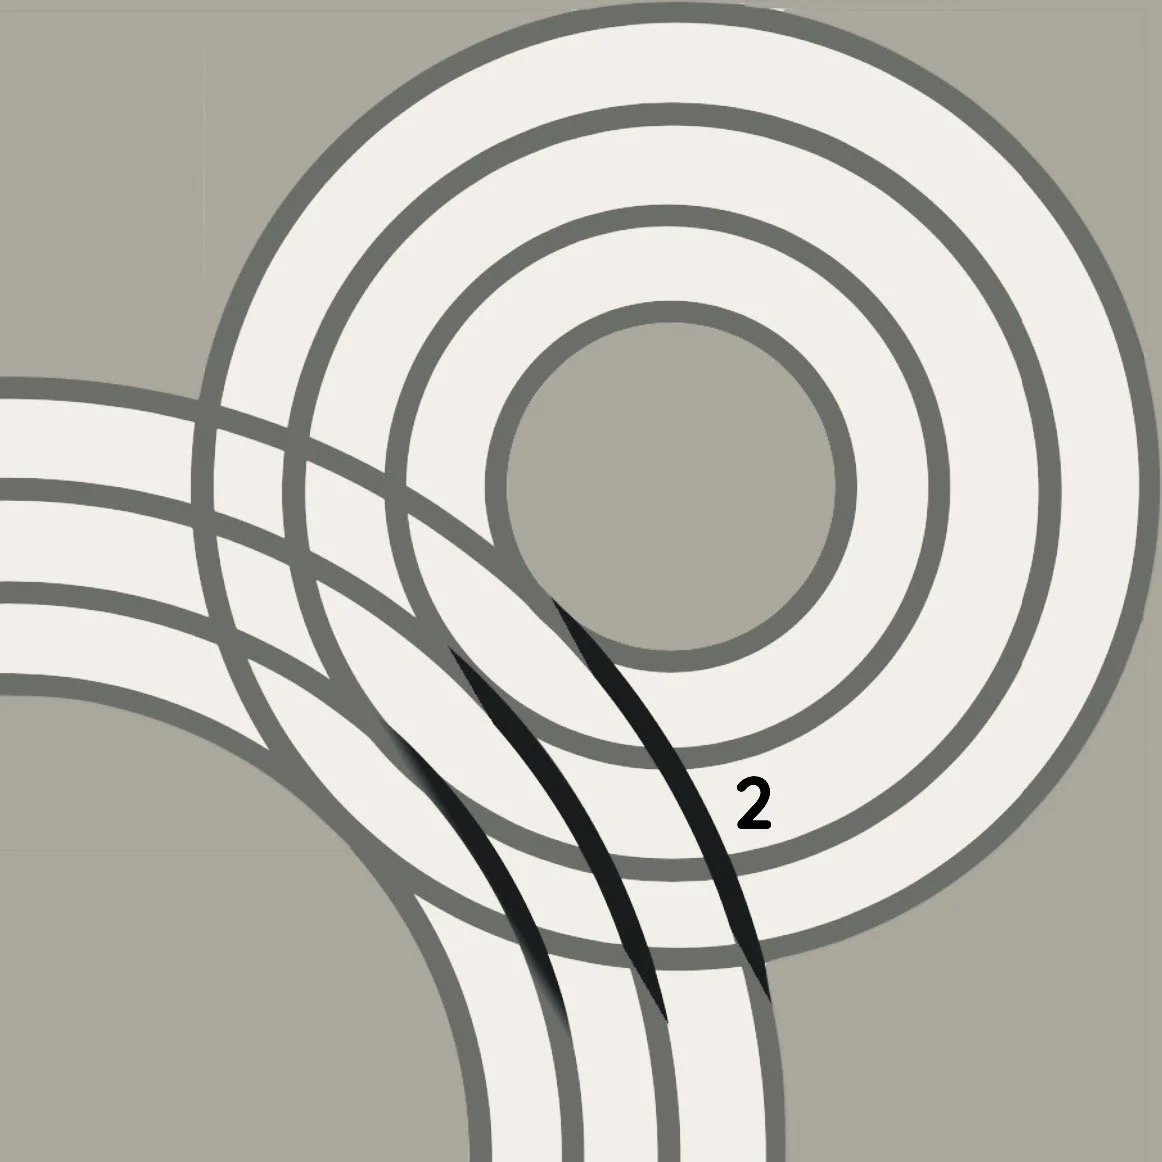
27) In result the bands of the corner ring are now woven clockwise. For anti-clockwise repeat the same process but with the two opposite sets of lines instead, line 3 and 4.
26) The quincunx and its bands are now woven clockwise.
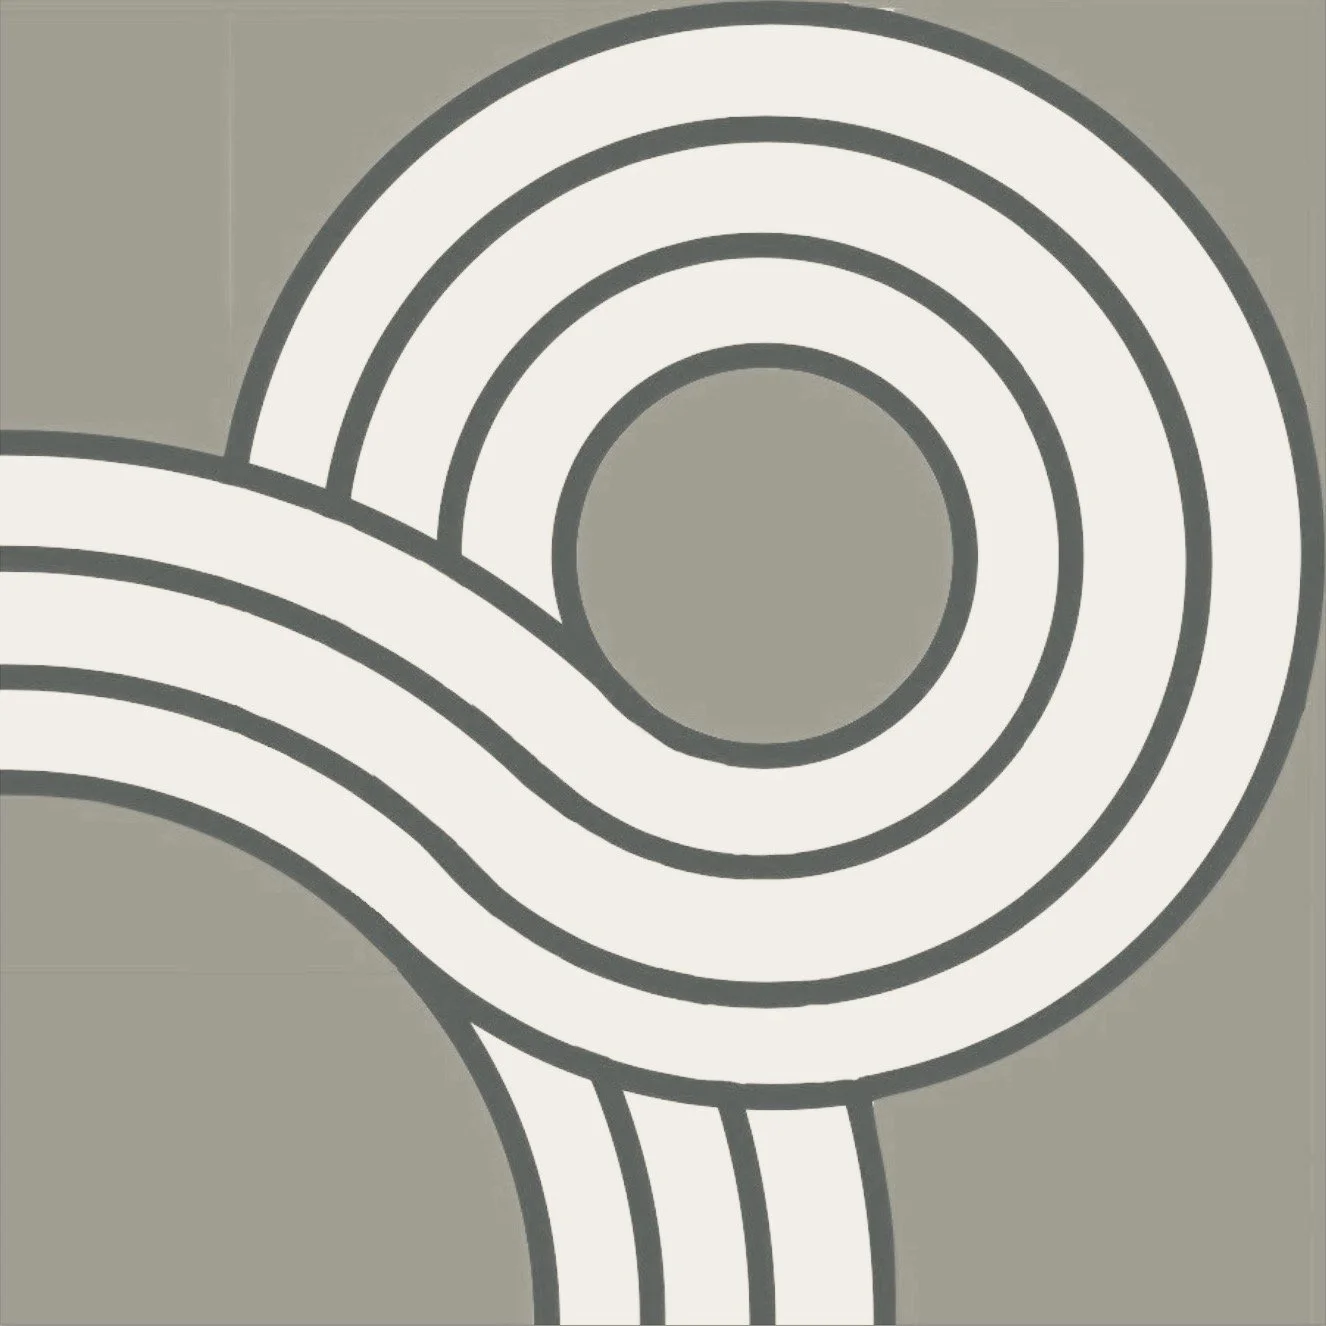
A clockwise woven Quincunx.